Blood Orange Flan with Blood Orange Caramel


Blood Oranges...one of my favorite fruits. I patiently look forward to early winter, here in the US, when these beauties begin to appear at my local super market and farmers market. From about December to April, I use blood oranges as much as possible, even squeezing and freezing the juice for future use throughout the year. Their distinct skin, marked by shades of orange, pink, and red, help them stand out amongst other citrus fruit, begging me to buy them and put them to good use!

Bright orange-to-crimson-red segments are striking when used in salads; blood orange zest added to Lemon Cornmeal Cookies or Citrus Glazed Pound Cake (instead of the lemon zest) adds a new brightness to these simple, classic recipes; and, one of my favorites - add freshly squeezed blood orange juice to enhance your favorite glass of champagne for a new twist on a Mimosa.

But, one of my favorite uses for blood oranges is incorporating them into a traditional flan. Made with eggs and egg yolks, milk and cream, this custard is only heightened with the added caramel that liquefies when cooked and pools around the flan when un-molded and served. The addition of the sweetness and tartness from the citrus plays beautifully with the lightness of the custard, especially with the addition of vanilla beans. And, combining the blood orange juice with the caramel rounds out the entire dessert.

Blood oranges
squeezing fresh blood orange juice!

Blood Orange Caramel Sauce poured into bottom of ramekins before adding the Flan custard
Yields about 8 flans using 10-12 oz ramekins
Ingredients:

Blood Orange Caramel Sauce
*1 1/3 C sugar
*1/2 C water
*1/3 C fresh squeezed blood orange juice (strained)

Flan/Custard
*3 C heavy cream
*3 C whole milk
*1/2 vanilla bean, split and scraped
*1 tbsp blood orange zest
*9 whole large eggs
*6 large egg yolks
*1 1/2 C sugar

Preheat oven to 325F.

First things first, get started on the caramel. Combine the sugar and the water in a CLEAN sauce pot. Turn the heat up to high, and allow the water and sugar to come to a boil. Let the sugar and water boil, about 10-12 minutes, until the sugar turns an amber/caramel color.

beginning stage of melting sugar and water together

sugar and water just beginning to boil

sugar "bubbles" getting bigger as water evaporates from pot during cooking process
sugar reaching amber/caramel color
Once the caramel reaches the amber color "state", remove from heat and allow bubbles to subside a bit - at this point the sugar will keep cooking and getting darker. Make sure not to take the sugar TOO DARK as the flavor will taste burnt. Using a wooden spoon or whisk, SLOWLY add the blood orange juice in small increments to the caramel, stirring constantly, being careful of the extremely hot steam that will emit from the caramel. Continue to add juice until all is added to caramel, and continue to whisk/stir until all of the caramel is thoroughly combined.

whisking the blood orange juice into the caramel
Pour the blood orange caramel sauce into a pourable container (such as a measuring cup), and pour into ramekins until the bottom is covered, about 1/4" thick. Do this with each ramekin and chill to harden and set.


While the caramel is setting/hardening, prepare the flan custard. In a large pot, bring cream, milk, vanilla bean (scraped seeds and pod), and orange zest to a simmer over medium high heat. Turn off heat and allow mixture to steep for 10-15 minutes.

blood orange zest

cream, milk, vanilla, and orange zest in pot 
Meanwhile, whisk together eggs, egg yolks, and sugar.


Once egg mixture is ready, add the cream/milk mixture, SLOWLY, to the eggs using whisk to completely combine. Strain mixture through fine sieve to remove vanilla bean pod and orange zest.

eggs and milk/cream mixture 
straining the vanilla bean pod and zest from custard
Place prepared caramel ramekins in a large baking vessel - you will be creating a "water bath" around the ramekins to assist in baking the custard, so make sure that there is at least enough room for the water to come AT LEAST half way up the outside of the ramekins.


Pour about 1 cup of the custard mixture over the caramel.


Place baking vessel with ramekins in the oven, and fill a measuring cup with hot water. Carefully pour the water into the baking vessel AROUND the ramekins, trying not to get any water into the ramekins. Fill the water up about 1/2 to 3/4 of the way up around the ramekins. Bake for 30-40 minutes or until completely "set" (meaning when you shake one of the ramekins the custard doesn't move, rather it is SET). Remove baking vessel from oven and allow ramekins to cool slightly.


Remove ramekins from baking vessel and water, dry off bottom, and chill in the refrigerator AT LEAST 12 hours, but more preferably overnight. Make sure to wrap with plastic wrap after an hour of cooling.

When ready to plate, run a knife around the outside of the flan between the flan and the ramekin, and invert the ramekin onto a plate. The flan should gently slide out, and the caramel sauce that once was on the bottom should pour out over the custard and flood the plate.

Blood Orange Flan with Blood Orange Caramel 
This dessert is so simply delicious. You can't beat the subtle combinations of blood orange with the caramel and blood orange with the flan custard. Though this may be a little time consuming, its presentation and flavor pays off in the end. Especially with a blood orange Mimosa!

Cheers and enjoy!

Dom's Short Ribs Braised with Apple Cider, Cinnamon, and Garlic


Over the years I have experimented with different ways to make short ribs, stepping away from the traditional red wine braise with a lot of onions, carrots, herbs, etc. I have made some with white wine and mustard; "Asian-style" with star anise and soy sauce; even just a couple of cans of Coke and peppercorns. All turned out fantastic.


But, if someone had handed me a container of apple cider and a few short ribs and said, "trust me, these will be some of the best short ribs you have ever had," I would never have believed them.


Until this past week...when Fellow Foodie decided to get "crazy" with some leftover apple cider, garlic, and a bunch of aromatics. As I had never attempted before, he decided to go more of the sweet/savory route, infusing the not-all-so-common-with-beef flavor agents, such as nutmeg, cinnamon, and brown sugar.


This was complete "uncharted territory" for me. Cinnamon and nutmeg...with beef? And apple cider too? Half of me was thinking, "What IS he thinking?" and the other half of me was focused on how this could be the next best recipe of all time.


And, I have to say, this IS now one of my top three short rib dishes I have EVER HAD. All of the flavors are reminiscent of Fall and Winter months, and the sweetness from the apple cider slightly caramelizes on the beef, creating a wonderful, flavorful crust. All of the other ingredients just seem to fall into place during the overnight marinade and the final braising process. This is a must try recipe before February is over. It would be best served with some yummy mashed potatoes or parsnips and roasted baby carrots.


Hats off to Fellow Foodie and his untraditional approach to the short rib. My current obsession for this fabulous dish is forever indebted in your unbelievable creativity.


Ingredients:


  • 12-16 beef short ribs, "short cut" or 8-10 regular cut beef short ribs
  • 1 gallon apple juice or apple cider
  • 1/2 C honey
  • 1/2 C brown sugar
  • 1/4 C whole black peppercorns
  • 6 cloves garlic, smashed
  • 3 bay leaves
  • 2 cinnamon sticks
  • 1 tbsp red pepper flakes
  • 1tbsp ground cinnamon
  • 1tsp ground nutmeg
  • salt and pepper
  • olive oil
In a large bowl, mix together all ingredients and pour over short ribs; marinate overnight in a large bag, pot, bowl, or baking vessel.

Next day: preheat oven to 350F.

When ready, remove short ribs from marinade and pat dry (save marinade - do not discard); season generously with salt and pepper.


Place a roasting pan over two stove burners (or do this in batches in a saute pan) and turn heat on to high; add olive oil to lightly coat bottom of pan and begin adding each short rib; brown on each side (about 4 minutes a side) until all ribs are browned.


Add reserved marinade to the pan and bring to a boil on stove top; once boiling, remove roasting pan from stove and tent with foil; place pan in oven* for about 4-6 hours, checking often**.


* This recipe can be done in a crock pot/slow cooker or on the stove top as well. Make sure to brown off the ribs first in either case.


**NOTE: "checking often" refers to watching if the temperature is too high or too low. If the liquid is bubbling any more than a simmer, turn the oven temperature down to 325F. If there is no rolling bubbles in the liquid, turn the oven up to 375F.


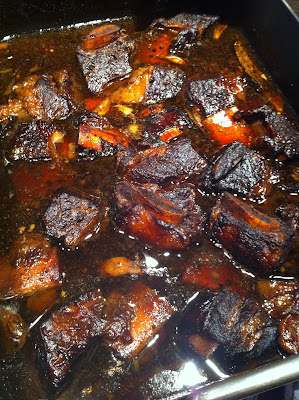
And, after waiting those 4-6 hours, the ribs are extremely tender and smell AH-MAZING.


Remove the ribs from the pan and allow to cool slightly before serving, if you can wait.


The aromas of apple, cinnamon, and garlic are intoxicating when taking a bite of these luscious short ribs. The "crunchy" outside of the rib, flavored with the essence of brown sugar and cider, are texture-ly heaven-ly with the moist, tender, slow cooked goodness of the meat closest to the bone. I can honestly say I am addicted to these ribs, and I think I can say the same for our dinner guests that night too as not one plate came back with any food on it. And the leftovers are even more divine.

The creation of these ribs led to more culinary creativity that night, and perhaps a grilled cheese with these short ribs, sliced apples, and a melted sharp cheddar cheese will end up on this blog soon. Until then, enjoy this wonderful recipe. Cheers and enjoy!

Currant Scones


Mmm, scones. When scones are done right, they are one of my favorite accompaniments to an equally "done right" cup of coffee. But, as many others may have experienced too, I have fallen victim to a dry, dense, flavorless mound of flour and butter that some bakers try to pass off as a scone, only to leave me less than satisfied.

Working as pastry chef at a restaurant here in Newport Beach, I "inherited" a recipe for scones that I swear by. The dough produces a tender crumb, is a balance of sugar and flour, and (dare I say) is extremely light. We used to use currants for these scones when served for brunch, but you could use any other dried fruit with the same end product.

I recently catered a baby shower where these were served with tea sandwiches - to which the scones received rave reviews. I thought it best to share something lovely and delicious.


Ingredients:


  • 4 C All Purpose flour
  • 4 tbsp sugar
  • 1 tsp kosher or sea salt
  • 5 tsp baking powder
  • 8 oz butter, cold, and cubed into pea-size (see photo below)
  • 1 C currants
  • 1 1/2 C (plus extra for brushing) heavy cream


Ok, "pea size" cubed butter: this is what it looks like. It is easiest (and best) to cut the butter when it is right out of the refrigerator. Once cut, put onto a plate and put back into the refrigerator or freezer to "chill" the butter. This is an important step as the colder the butter is the flakier the dough will be.


Preheat oven to 375*F.


Using a standing mixer with the paddle attachment (you could use a food processor, but I prefer this method), add the flour, sugar, salt, and baking powder to the mixing bowl; turn on mixer and thoroughly combine dry ingredients.


Next, add chilled butter to the dry ingredients. Make sure to try to separate each of the cubes into the flour. 


Turn the mixer on, starting slow and working up to medium speed, allowing the butter to "break up" or "cut" into the flour mixture, creating what sort of looks like crumbly sand. This will take about 8 minutes if not longer.


Next, add the currants to the butter-flour mixture. Turn mixer on to low to combine all of the ingredients thoroughly.


Add the cream to the mixer, and starting on low mix the ingredients together until the dough just comes together. Then turn the dough out onto a lightly floured work surface; lightly knead the dough until it comes together in one cohesive mass.


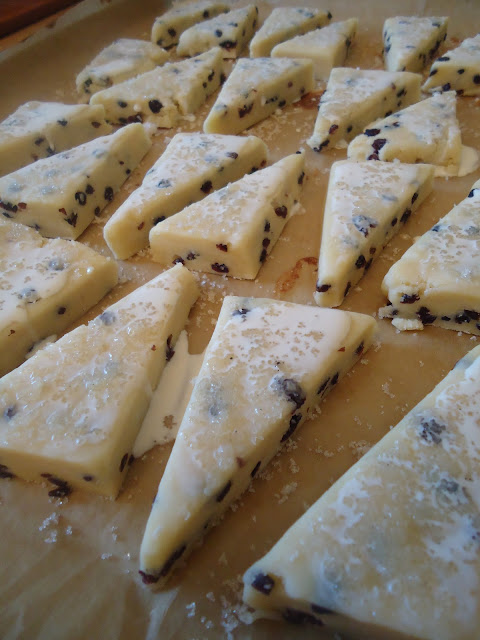
Roll out the dough to about 1" thick, and cut as you desire. I prefer cutting the dough into triangular shaped wedges. Brush each scone with a little cream and sprinkle with a little sugar.


Bake at 375*F for about 10-15 minutes or until light brown on top and appears cooked through on the sides. Remove from the oven and allow to cool for about 8-10 minutes before serving.


These scones are perfectly light, not too sweet, and the flavor of the currants balances very well with all of the other flavors. You can use this "base" scone recipe and add a myriad of ingredients: chocolate chips, cinnamon and apples, lemon zest...the sky's the limit.