"Theta" Swiss Cheese Dip - So Simple, So 1970's, So Effing Good.


To some of you, you may be wondering, what IS that goop in that bowl?

To others, you might no EXACTLY what this cheesy, oniony, creamy dip/spread is.

If you guessed Party Marty's (my Mom's) Swiss Cheese Spread, you guessed correct.

In which direction I would have to send you to find the origins of this recipe I haven't a clue. I grew up only knowing this spread was brought to a dinner by one of my Mom's sorority sisters in the 1970's, and from then on it was referred to in my house as the "Theta Cheese Dip" (Party was a Kappa Alpha Theta at USCB, and I only add this because she was very proud of her time spent there).

Thanksgivings, Christmases, birthdays, impromptu cocktail get togethers and other cocktail parties, luncheons, even just to have around: I cannot tell you how many times my Mom has made this spread/dip over the years, only to be followed by rave reviews and equally fanatic following fans of the Theta Cheese Dip.

And, I have watched Party make it many of these times, knowing just how easy it is, and knowing just what ingredients go into it. But, as many can say about watching our mothers or grandmothers cook from memory rather than a recipe, it can be a daunting task to try to make it on your own and have it taste "as good as Mom makes it".

Recently, Party was going to yet another holiday party and yet another friend dearly requested she bring the infamous cheese spread. As I saw her pulling out the ingredients from the fridge, I immediately asked if I COULD MAKE the dip with her looking over my shoulder so I would know exactly how much of this and that to add. She happily obliged.

Now, I must say that this dip isn't labor intensive nor a laundry list of ingredients, or, to add, "crazy ingredients". You might have all of the necessary components in your fridge and pantry right now!


Shredded Swiss cheese, chopped green onions, mayonnaise, sour cream, Lawry's Seasoning Salt, and Lawry's Garlic Salt.

Yep, that's it.

But, it is so cravingly delicious!

So, how much cheese, Party?

Now remember, there are VERY few and far between moments that she does measure anything, let alone follow a recipe. So, this is all from "eyeballing".

2 "blocks" of swiss cheese, shredded


...about 1 bunch of green onions, thinly sliced


I like to slice the white part of the green onion down the middle to get smaller cuts of the onion.


then, add the sour cream (left of photo) and mayo (right of photo) - it was about 3/4C to 1C of sour cream and 1 1/2 C mayo for this mix, but once again everything was eyeballed. You are looking for the consistency not to be too wet. Mix together and taste - yes taste! I know you haven't added the two salts yet, but taste because the mayo, cheese, and sour cream all have trace amounts of salt in them, so you want to understand where the flavors are going before OVER seasoning it.

Now, I actually did the seasoning, but I wanted to get a pic of Party looking as if she was making it all herself...


I would start with 4-5 "shakes" of each the seasoning and garlic salt, mix, and then taste. Keep adding salt as you think needed. This dip will need to sit for about an hour (or longer) to let the flavors marry and melt together - just keep that in mind!


And, "voila" - um, yes, it is not the most attractive mixture, but it is OOOH so good. The sweet nuttiness of the swiss cheese, the creamy tang of both sour cream and mayonnaise, the oniony crunch (let alone color) from the green onions, and the balance of seasoning and garlic salt make this an irresistible spread/dip for any occasion. The emphasis on showcasing the texture of the cheese rather than making it uber-creamy is the key.

And, a few hours later, my Mom sampled my try at her recipe, called, and reported "just as good as mine". Seal of Approval from Party Marty = two thumbs up.

As a chef that has many times tried to think outside the box for holiday appetizers, this one takes the cake for simple, satisfying, and so so sooooo good. Enjoy!

Use the WHOLE Bird, and Then Some


(I didn't know when I took these pictures in my studio apartment, let alone this visit to the San Francisco Farmer's Market, would be my last as a resident of one of my favorite cities on earth, so this post is important to me. In a city that always has so many things going on, I would find myself on many weekend days wanting to do nothing but escape the craziness of the "City by the Bay" and just hole up in my apartment, cooking all day. Making this chicken soup was one of my favorite things to do. I hope you enjoy!)

I love chicken and vegetable soup. It is so simple, healthy, and satisfying. Just the smells of chicken, carrots, onions, and celery (possible aromas of potatoes or pasta as well...) evoke memories of being a young girl, sick at home from school, my mom in the kitchen whipping up some chicken soup to warm my bones and settle my stomach. I grandly remember her saying "this WILL make you feel better. It is really good for you!"

And that it did. For some reason I was "magically" better after a few bowls.

In college, living on my own for the first time, there were many days and nights, feeling very under the weather, that I would crave being at home: wrapped up in a blanket, my Mom back in the kitchen heating up some chicken soup for me to heal my aches and cough. I would trudgingly drag myself to the supermarket and pick up a few cans of chicken soup, heat them up, and try to get each drip of broth and chunk of veg or chicken down in order to get better. The cans never tasted the same as my Mom's soup - but it was a decent substitute to bring me back to health, even if it was all mental that the soup was making me feel "better".

It wasn't until culinary school that I really started to understand the building blocks to making a fantastic chicken soup, and, of course, it all starts with one thing: the chicken stock. Well, technically it starts with the chicken, but the broth/stock is the biggest flavor agent, so it takes some time and TLC to bring all of the flavors of the chicken bones, vegetables, and aromatics together.

So beyond relating chicken soup to just something I eat when I am sick, it is also something I immediately think to make on a lazy Saturday or Sunday. Over the course of the day, I love roasting the chicken, shredding the meat, simmering the bones with onion or leek, celery, carrots and thyme, straining my stock, and then putting it all back together for an incredibly simple, delicious, and healthy chicken vegetable soup.

As you all know, I am a huge supporter of all things sustainable, organic, home-grown or straight from the farmer's market. So, we set off for the San Francisco Ferry Building one Saturday and began to pick our fresh ingredients, right down to the chicken. I immediately hit up Marin Sun Farms for our bird. We picked up our carrots, shallots, and celery from a couple other purveyors as well as a bunch of fresh thyme. Just on a whim, I decided to pick up some fresh chicken stock from Golden Gate Meats to do a side-by-side taste test, but I will get to that in a bit.

We got back to our apartment and I began my happy culinary Saturday in the kitchen.


In the case of roasting chicken for this soup, I simply rub the skin with olive oil and season with sea salt and cracked black pepper (sometimes lemon pepper). You could use other aromatics, such as citrus, herbs, vegetables, etc., but I don't think they are needed in this process - rather, I try to maximize the flavor of the chicken.


When roasting this chicken, I preheat the oven to about 450F, pop the chicken in breast side up, and roast it for about 30 minutes; I then reduce the heat to 350F and allow the bird to cook until a thermometer inserted into the thigh area reads about 165F (time depends on size of chicken). Once the bird is cooked, I cover it with foil and allow it to sit for about 30 minutes before I begin carving the meat to shred for the soup.


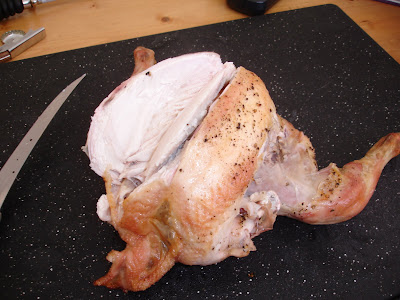
I prefer to carve the chicken, starting with the breast and finishing with the legs and thighs and THEN slice the meat as much as possible. Whatever method you choose, just prepared to be "one" with your chicken as you want to get as much of that succulent meat saved for your soup.


Bones, meat, skin and all...the whole process really gives you more respect for what you are eating!


Meanwhile, I chopped up some carrots, shallots, and celery to use to make my stock. You could use leeks or white onions instead of shallots and any other vegetable you would like to flavor your stock. Remember, any of these flavors added at this stage will be present in the broth for your soup.


When making my stock, I like to keep it really simple. In addition to the chicken bones and veggies, I add fresh thyme sprigs, a bay leaf, and cracked pepper. Add all to a stock pot and cover with cold water just to cover.


Bring stock to a boil, skim off any foam that forms, and reduce the heat so that the stock gently simmers. Timing on the stock varies, as I greatly appreciate getting it on the stove, doing things around my apartment, and coming back to check on it periodically. If I had to put a time on it? About 2 hours (but remember, my chicken was SMALL), roughly, but I favor the idea of tasting the stock as you go. Too watery? Let it go a bit longer. The stock created will not be enough for a whole pot of soup, but it really adds body to the soup, plus it is therapeutic to make!


So, back to my point of the stock I bought from Golden Gate Meats. First, this is in no way meant to be a jab at GGM, but I was truly fascinated to taste my basic stock side by side with theirs. Mine was clean on the palate with little to no residual fat, bright with onion, celery, and shallot with a hint of thyme. GGM's was greasy on the palate and tasted flat of chicken. It gave me further happiness that the time put into my stock, though it only yielded about 2 full cups, was well worth the effort. I always prefer to use fresh stock, but when adding additional stock/broth to the soup, I also like Pacific Natural Foods and whatever-brand-they-sell-at-Trader Joes Organic Chicken Broth.


Next, I add my veggies to the pot...


And I add the chicken, chicken stock, extra chicken broth, and fresh thyme to the pot. I let that simmer for a while to let the flavors "marry".


...and plated.

...and slurped.

...and devoured.

Simple ingredients, happy stomach, happy heart. Um, does it get any more satisfying?

Oh, wait, the next day, it WAS more satisfying. But, then again, soup the following day is always better.

If this isn't the ULTIMATE Christmas gift, then I don't know what to ask Santa for.

Coming (back) Soon...

Hey all,

Just wanted to say I really appreciate all of the emails from people who read this blog that they want to see more and are wondering why I haven't written in a while. I am in the process of moving, and will be back and at it, writing wise, in December! Thanks again for all of the encouragement to keep this up. Cheers to all!

Best,

Lesley

Good Things Come to those Who Wait (and, in this case, pork shoulder)

If you read this blog and aren't familiar yet with my love affair of all things pork, well, I guess you must start somewhere.

And, if you have been reading my blog and have had enough with my references to the fantastic pig, well, I guess let this recipe change your perspective.

One of my favorite things in the world is slowly cooked pork shoulder (aka pork butt). I love how such a inexpensive yet simple cut of meat can be coaxed by flavorful herbs, aromatics, and liquids into a "melt-in-your-mouth" experience. Even in the case of the most basic carnitas - braised in a simple liquid, then deep fried and chopped and piled into a simple corn tortilla with the most meager of garnishes - I still start to salivate.

My obsession with pork shoulder, or trying to "perfect" pork shoulder, started after visiting a family favorite restaurant, Taleo, in Irvine, CA. Growing up in Southern California, where I feel Mexican restaurants out number every other type of cuisine combined, I had been over-exposed to traditional carnitas all my life. On one visit to Taleo, which is known for "authentic Mexican cuisine", using spices and ingredients from all of the Mexican provinces, my Mom asked if I had tried their carnitas yet.

"No, and I am not really in the mood for basic pork carnitas right now," was about what my response was. But, my Mom insisted they were "totally different" and that I needed to try them. I read further on the menu, and this excerpt, taken from www.taleomexicangrill.com, says it all:

"Carnitas, while a staple in Mexico City, are almost never found (properly executed) stateside. In order to be done right, they require more time and labor than other restaurants are willing to invest. It’s also a cooking technique that falls somewhere between art and science. Chef Jose’s pork comes out tender and juicy on the inside, crispy and sweet caramelized on the outside. It truly is a dish unique to Taléo."

I was, in fact, in pork shoulder heaven. These carnitas were NOTHING like I had ever tasted. Caramelized to a light crisp on the outside, super moist on the inside, and the essence of citrus and spices permeated from the plate mixed with the subtle scents of cook pork and pork fat. I savored every bite, trying to figure out what exactly had been used in the marinade as it is a restaurant secret (even the owner, who is a friend, will not divulge anything to me about the process, rather he likes to leave me guessing everytime I ask). And, the entree portion is served whole, as in not shredded or chopped up, allowing you to pull the meat apart yourself by each tasty morsel.

Since then, I have been on a recipe/ingredient quest to try and emulate the carnitas from Taleo. I have tried everything from using spice rubs, different citrus juices, prepared sauces, alterations on cooking techniques, even adding a can of Coca-Cola at one point (all thanks due to BFF Lissa and her amazing pulled pork). But, alas nothing really mimicked the fantastic pork carnitas that Taleo serves up every day. Growing tired of buying pork shoulder and freezing leftovers after leftovers, I decided to throw in the towel on the perfect copy-cat version and rather focus on other proteins, knowing when I came back to cooking pork shoulder again, this time it would be on my cooking terms and uniquely my own.

This past weekend I was at the San Francisco Ferry Building Farmer's Market, and I visited one of my favorite meat, pork, and poultry producers, Marin Sun Farms. Not only are their products all sustainably farm-raised, they are also fantastically delicious. I spotted some pork shoulder, and, having had about 6 months pass since I last bought any, I decided to pick some up and figure out what to do with it when I got home.

I will admit, I did open my spice cupboard, took one look at my spice blend and a can of pineapple juice and hesitantly considered one more try at Taleo's carnitas. In the next moment of sanity, I decided to keep it simple ingredient-wise, and decided to use what I had on hand, bringing out fresh and simple flavors to enhance the amazing pork. I pulled out a head of garlic, a lemon, white wine vinegar, dried oregano, salt and pepper. I had seen a recipe recently using similar ingredients, but my version was entirely different.

Here's what I did. Add the following ingredients to a food processor to form a loose paste/marinade:

* 1 head garlic, cloves peeled
* 1 1/2 tbsp salt (kosher or sea salt)
* 1 1/2 tablespoons dried oregano
* 2 tablespoons white wine vinegar
* 2 tablespoons fresh lemon juice
* 4-5# pork shoulder, cut into giant chunks


Here is the pork shoulder. I just cut it into 4 equal chunks (PS I was working with roughly 3# of pork shoulder. I "upped" the poundage for the recipe as I think it will work better with the level of acidity and garlic, or follow what I did).


I wanted to keep the pork in larger chunks and allow the fat to caramelize during the cooking as well.


Spread the marinade all over the pieces of pork, and place in a baking/roasting pan - you will use this pan to cook the meat. I prefer to use glass Pyrex baking pans. Marinate the pork at least two hours. Does not need to be marinated overnight.

Post-marinade being put on pork - smelled amazing!


Preheat oven to 350*F. Bring pork out to room temperature for about 20 minutes. Place a piece of parchment paper over the pork and then wrap with foil.

Ready to bake!


Place the parchment on top of the pork. The whole purpose is to contain the moisture as the pork cooks since we are not adding any liquid to the pan.


Once wrapped with foil, bake, covered, for 2 hours. After 2 hours, remove parchment and foil and add 1C chicken broth or water to the pan; bake, uncovered, for another 2 hours, flipping the pieces over every 30 minutes and basting with juices.

Meanwhile, I decided to saute up some onions since we were going to enjoy some tacos with this pork amazingness.


And, after 4 SLOW hours of cooking, I pulled my pork shoulder from the oven. Honestly, I wish I could have captured the smells coming from the pan. The fat bad melted and broken down with the garlic, creating this roasted garlic infusion; the dried oregano blended perfectly with the meatiness of the pork, and the acidity of the lemon and vinegar seemed to fold into the rest of the ingredients. And all of that was just from smelling my concoction.


I like to use 2 forks to pull apart the meat and shred it, fat and all.


One lucky piece that ended up immediately in my mouth.


Shredding up the pork goodness.


And plating an open faced taco - I just wanted to keep it simple, and I additionally made a spicy sour cream with Cholula, chipotle pepper powder, and garlic salt.


This pork was super moist, and the crust and fat was super caramelized. It may not be Taleo's creation, but finally, I was happy with MY pork shoulder/carnitas creation. I didn't overthink anything, as I had done previously trying to perfect a recipe. And, I felt complete having honored the pig and the way it was sustainably raised by the Marin Sun Farms co-op farmers by keeping the flavors simple and fresh, honoring the pork shoulder the way it should be.

** I would love to know if anyone adapts this recipe to use in a slow cooker, and, if so, let me know how it turns out!

Comforts of Fall


Sometimes, the simple things in life can be the most satisfying...to the soul, to the heart, and, in my case, most importantly, to the stomach.

It's finally Fall; time for leisurely Sundays spent watching Football, time for the leaves to start changing color, time for the weather to cool off and beg you to wrap yourself up in the blanket at the end of the couch, time for the smell of a fireplace burning off in the near distance (damn my studio apartment for not having one), time for putting away tank tops and t-shirts from the summer months and bringing out sweaters, scarves, and jackets to carry us through the Winter months.

Time for simplicity and satisfaction in the form of comfort food. And, in my case, this means whole roasted chicken.

I am starting to keep a food diary, and this is what I wrote the day I roasted this fantastic bird:

"It is a very rainy day here in San Francisco, and this weather only evokes the desire for me to be in the kitchen, cooking up a storm. Nothing is more pleasing than the sound and smell of rain mixed with the sounds and smells of a kitchen humming.

"Brett and I were just at the market, and he asked what was for dinner. I had begun planning a flavorful but lightened-up version of beef stew with white wine and Dijon mustard (a different stretch for me[recipe to come]), but he asked if I could make a roast chicken instead. He really wanted something comforting and loves how I do chicken. Enough said to convince me.

"I immediately thought of making a compound butter, but I wanted to keep it light and bright and not weigh down on our stomachs with the volume of rain falling from the sky. I decided on butter, parsley, shallots, and garlic with lemon..."

Well, I will just pick off where I left off. I am a huge fan of compound butters, especially when it comes to chicken or turkey. Any amount of flavor you can add to butter will only enhance the flavor of the bird, not only the roasted, crispy skin. Some find compound butters daunting; I finds them one of the easiest things to make and use (and freeze for future use!!).

One of my favorite, simple compound butters that works for everything from whole roast chicken, chicken breasts, turkey breasts, or, even Thanksgiving turkey is:

6 cloves garlic
1 large shallot, roughly chopped
1/2 C fresh parsley (as if it was packed into a 1/2 C measuring cup - just eyeball it)
1T olive oil
1-2 tbsp lemon zest
1/2 C (2 sticks) butter, room temperature (very soft)
sea salt and freshly cracked black pepper

Place garlic, shallot, parsley, olive oil, and lemon zest in food processor and pulse together to a paste:


Next, add butter and continue to blend together until mixture is thoroughly combined into a luscious, aromatic, buttery paste:


From this state, you can put it in a plastic container and refrigerate or freeze (up to 2 weeks or 6 months, respectively), or keep about 1 C plus 2 tbsp out at room temperature for the chicken. The butter MUST be soft and at room temperature or it will seize up when you try to stuff the chicken with it.


So, onto the chicken; make sure to remove all giblets and anything else stuffed in the cavity of the bird before using. Also, make sure to rinse the bird thoroughly and pat dry.


Next step, loosening the skin between the breast and thigh meat with out tearing it off. You can start loosening the skin either at the neck-end or at the other end, as I have in the picture below. The point of this is to create a "space" to spread the butter between the meat and the skin, allowing the flavors to cook into the bird and outward to the skin.

Gently, without ripping, loosen the skin against the breast. Move your fingers under the skin down to the leg and thigh as well, making a sort of "baloon" under the entire breast-up-side of the chicken.


Using your hands or a spoon, smear some of the butter under the loosened skin; make sure to get the butter all the way down to the leg and thigh meat - you will most likely have to use your hands to get all the way around the leg and thigh meat.


Using the back of the spoon or your fingers, move the butter around under the skin covering the breast to evenly coat the meat. Use the rest of the butter to cover the skin on the outside of the bird as well to aid in creating a crisper skin (and more flavorful one at that!).


Almost ready to go. Note the lemon wedges sticking out the end of the breast bone? Well, I am getting to that.


Here is my "potpourri" of aromatics to stuff my chicken with, to include the lemon slices:

1 medium bunch of fresh parsley
2 large carrots, peeled and roughly chopped
1 small onion, roughly chopped
8 VERY thin slices of lemon, and then the rest of that lemon roughly chopped


ALL of this goes in the cavity, except the lemon slices. Carefully place each of these slices on top of the butter under the skin covering the breast; this adds just a little more citrus flavor, but it make the chicken that much more visually delicious to eat when the bird is done roasting.


What's leftover of the potpourri can just be scattered on the bottom of the roasting pan:


And, once the chicken is trussed (sorry, no tutorial on trussing this time around...) I place it on a rack, pour about 1/4 C chicken broth or water in the bottom of the pan, and pop the bird in the oven to roast for 30-35 minutes at 450F. Then, reduce the oven temperature to 325F-350F for about 1.5-2 hours until a thermometer inserted next to the thigh bone registers 165F.


I did take some pics of carving the bird, slicing through the moist meat and crispy skin, making a pan gravy with the leftover butter drippings mixed with fresh mushrooms and shallots and parsley, but, alas, leave it to technology because all of the pics turned out a bit fuzzy. So, please try to savor each and every tasty morsel and each and every citrus-y, buttery scent that came from this amazing roast chicken.

One of the best things about roasting this chicken? During the time it took to cook, I poured a glass of wine, grabbed that blanket at the end of the couch and wrapped myself up in it, turned on some Monday Night Football, and listened to the cheers of fans on TV mixed in with the steady downpour of rain outside my window. Even without a fireplace, it all felt very reminiscent of Fall. It's important to enjoy the simple things, especially when they comfort every aspect of your life.

And once the chicken was ready? I peeled that blanket off of me, turned on some Frank Sinatra tunes in the kitchen to carve the bird to, and embraced the warmth that came from the oven's heat. Screw the fireplace, I thought in that moment. And we enjoyed every comforting bite of that simple, perfectly roasted chicken. And, once the dishes were done and the oven was done cooling off, I pulled that blanket back from the end of the couch, took a final sip from my glass of wine, watched the end of the football game, and comfortably fell into the rest of the evening, with the sound of rain still hitting my window, and my stomach happily satisfied.