Asian-Inspired Braised and Barbecued Short Ribs - A Must for Your Grill this Summer


Mmm, short ribs. Quite frankly one of my favorite cuts of beef. Usually they remind me of the cold, Winter months when I love to braise them all day, the aromas of bacon, onions, herbs filling the kitchen as the short ribs slowly simmer in a flavorful broth, becoming ever-so-tender and literally "falling off the bone". 

But it's Summer, and utilizing the BBQ and dining outside is what I am all about. Plus, I wanted to experiment with short ribs in a different way.

I was lucky enough recently to purchase some incredible meat from Chaffin Orchards, to which I wrote about their amazing grass-fed filets a few weeks back (http://fiveoclockfood.blogspot.com/2010/06/sustainable-simple-just-plain-delicious.html). I was flipping through an issue of Fine Cooking's "Grilling" magazine I picked up at the market and saw an Asian-inspired recipe for braised and BBQ'ed short ribs. This was something worth trying!


(I modified the recipe slightly as I most often use recipes as guidelines rather than follow to a "T")

Ingredients:

Dry rub:
* 1T ancho chile power
* 1-2 t Chinese five spice
* 3 T brown sugar
* sea salt and ground black pepper

* 2-3 pounds short ribs, either flanken cut (as pictured above) or English cut (will just need to braise longer)

For braising:
* 2 T olive oil
* 1 onion, chopped
* 4-5 cloves garlic, roughly chopped
* 1"-2" piece of fresh ginger, roughly chopped
* 3 cups chicken broth
* 1/4 C low sodium soy sauce
* 1/4 C rice wine vinegar
* 3 T brown sugar
* 2 T fish sauce
* 1 star anise pod 

First, the dry rub. These ribs really take the flavors on, so make sure to get this rub on the ribs at least 2 hours before cooking, preferably overnight. Mix together all of the dry ingredients in a small bowl:

Next, get that rub evenly spread all over the ribs:


Spicy, sugary, salty goodness.

Put the ribs in a plastic bag or baking dish covered with plastic wrap and let them "marinate" in the fridge until you are ready to cook.

When ready to begin the braising, bring the ribs out of the fridge for 20 minutes to let them come up to room temperature. Heat the olive oil in a deep pot on medium-high and add ribs, browning on all sides. They probably won't all fit in the pan at once, so just do this part in batches. 


Remove from pot and set aside on plate. 

Next up to the pot - onions, garlic and ginger. Add all three and cook on medium until the onions begin to soften, about 5 minutes.


Once the onions are soft, add the chicken stock, removing the browned bits from the bottom of the pan. Continue adding the soy sauce, rice wine vinegar, brown sugar, fish sauce, and star anise to the pot. 


If you haven't cooked with start anise before, here's what it looks like. One pod packs a lot of flavor for a braise like this. Plus, it is one of the five ingredients in Chinese five spice used in the dry rub.


Add the short ribs back to the pot, making sure to "cover" or "submerge" the ribs as much as possible in the liquid. Bring the liquid to a boil, reduce it to a simmer on LOW heat, and cover with a lid. Make sure throughout the whole braising process that the liquid is never boiling but rather gently simmering. If the simmer is too high the meat will become extremely tough, and that is not what we are looking for. 


And then, we wait. And wait. And wait. The aromas in my kitchen were tempting my taste buds, but I waited patiently. Check the ribs about every 30 minutes, making sure the liquid is simmering and the ribs are submerged. Total cooking time was about 2 hours (this also can be done in a slow cooker/crock pot, although times will vary).

Now, fire up that BBQ. In this case, I took the pot with the ribs over to a fellow foodie's house and we used his charcoal grill. Remove the ribs from the pot and reduce the braising liquid on the stove, reducing to thicken (there will be a small layer of oil on the top from the cooking process - you can skim it off or just leave it alone). Glaze the ribs with a little bit of the reduced liquid and get them on the grill.


We also threw on some asparagus and scallions for the short rib feast!

The ribs are already cooked, so you don't need to BBQ the heck of them. Just char them to get that fantastic crust on the outside.

And to plate: hit those ribs with some of the reduced sauce again. I made some jasmine rice to which I added toasted sesame seeds and the grilled scallions (chopped), and served alongside were the perfectly grilled asparagus. I couldn't wait to dig in.


I wish that this post had a "scratch and sniff" plug-in to explain just how delicious this meal was. The short ribs were fork tender and tasted AMAZING. All of the flavors, beginning with the dry rub then the braising liquid, were dancing around in my mouth. The char from the BBQ was perfect and slightly caramelized the brown sugar, adding just another depth of taste. Plus, the rice was the perfect, basic compliment to the otherwise complex sauce coating the ribs. 

This is a new Summer staple for my recipe box. And, as I am back in Southern California where BBQ's are pretty much used year round, this recipe will probably find its way to a grill this Winter.

Cheers and enjoy!

Sunday Roasted Chicken with Lemon-y-Herb Compound Butter


One of my favorite, most simple-yet-oh-so-versatile things to make and use when cooking chicken is a flavorful compound butter. Whether it is the whole bird, thighs, drumsticks, or the breast, any shmear of an aromatic butter just makes it better. And, sometimes, it is a really good way to get "rid" of extra herbs, spices, onions, garlic, or citrus you may have on hand.

The other night, I did a scan of what was in my fridge, and realized that it was probably best to use what I had on hand for a yummy butter to stuff under the skin of a local, sustainable chicken (about 4 pounds in weight) I had bought.

So, here's what I found....


* 2 sticks of butter
* 3 slices of prosciutto
* zest and juice of 1/2 a lemon
* 4 cloves of garlic
* 1 shallot
* huge handful of fresh basil
* huge handful of fresh parsley
* sea salt and fresh ground pepper

Pretty good findings for a compound butter, I must say.

Though I have written plenty about my love of compound butters, I do continuously get asked, exactly, what is a compound butter? Basically, it is butter (salted or unsalted) that has been mixed with seasonings and other flavor agents (savory or sweet) to "enhance" the butter for whatever you may be using it for. Compound butters are used often to finish steaks or fish as a nice "garnish", but I think that they truly shine stuffed under the skin of chicken or turkey.

And in this case, the spotlight was on my chicken. 

When making a compound butter, it's best to bring the butter to room temperature. You don't need to use a food processor, but I prefer to. If you don't have one on hand, make sure the butter is extremely soft and use a plastic spatula to fold all of the ingredients together. 

Also, bring the chicken out and allow it to sit out of the chill of the fridge for about 20 minutes. This will help in adhering the butter under the skin as the chicken "meat" will not be too cold.

First, I roughly dice the prosciutto, shallots, garlic, parsley, and basil. All of this is going to take a "whir" in the food processor, so there is no need to over-chop the ingredients. (If you don't use a food processor, make sure to finely chop all of the ingredients.)


Add the soft, room temperature butter to the food processor with the lemon juice and grate the lemon zest - I find that zest just adds that extra citrus "punch".


Next, add the chopped ingredients to the butter:


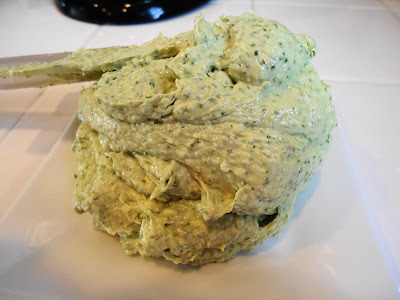
Then, let the compound butter-making begin. Just let the food processor do the work, and, perhaps, grab a glass of wine (I'm just saying...).


You will probably have too much butter for one whole chicken, so go ahead and freeze the rest for another time.

Next up, the chicken. Using your fingers, begin to separate the skin from the breast meat, moving down over the drumsticks.


Using a spoon, begin to "stuff" the butter under the skin of the chicken, making sure to spread evenly all over the breast meat and drumsticks/thighs. I also like to use a little on the outside of the skin to give it flavor and help in the browning process.


I choose not to stuff the cavity with anything, but you could add lemons, onions, garlic, or more herbs before roasting the chicken.

I like to do this at least 24 hours before to let all of the flavors come together with the chicken, but you can just as easily cook the bird immediately. In any case, I preheat my oven to 450F. Place the chicken in a roasting pan on a roasting rack and bake in oven at 450F for about 25 minutes until skin begins to brown and crisp. Turn the oven temperature down to 350F and continue to roast for another 35-40 minutes, or until a meat thermometer inserted between the breast and thigh reads 160-165F. Remove the bird from the oven and tent with foil for about 10 minutes - this will allow the juices to settle and the chicken to carry over a few degrees in temperature.


The aromas coming from the butter were intoxicating. It was pretty difficult to wait those 10 minutes while the chicken rested, but every second was worth the wait.

Continuing to "clean out" the fridge, my fellow foodie bff and I decided to throw a simple salad with avocado, maui onion, and pine nuts with a few garlic-rubbed crostinis on the side.


It was a fantastic, simple Sunday dinner, and the chicken was extremely moist and flavorful. The essence of basil and parsley perfumed the meat, and the hint of prosciutto added a nice richness to the whole meal. I even seared up some of the skin from the breast in a non-stick skillet, which added a fantastic, crispy, herby topping to an otherwise well rounded plate. And the best part (besides leftovers for days...) is the fact there is leftover butter in my freezer to do it all again soon.

Cheers and enjoy!

Seared Scallop Salad with Ruby Red Grapefruit, Avocado, Vidalia Onion and Chive-Citrus Vinagrette


I am a huge fan of scallops, any time of year, but I especially like cooking with them during the Summer months - pairing them with light sauces and sides as a main entree, or simply searing them and serving as a protein atop a bright salad filled bursting with citrus flavors. 

And yesterday, my craving for these lovely mollusks came a' calling. After picking out a few fantastic ingredients at Whole Foods, I knew what my dinner was going to be.


May I introduce you to the above ingredients that truly made one of the best salads I have ever created, and, to my surprise, that I have ever had.

(I only cooked this salad for myself, hence the 4 scallops, but you can vary the amounts of the ingredients to your taste and liking. If you are allergic to shellfish, chicken would be a great addition or any other whitefish, or go without a protein and crumble some goat cheese on top!)

Ingredients:

* fresh chives, chopped
* 1/2 shallot, finely minced
* 1 ruby red grapefruit, 1 tablespoon juiced and about 6 segments of fruit (explained below)
* 1 tbsp fresh squeezed lemon juice
* 1-2 tbsp extra virgin olive oil (remember the better the oil the better flavor of vinaigrette)
* baby romaine lettuce (or butter lettuce)
* 1/2 avocado, sliced to your liking
* 1 heart of palm, sliced
* 1/8 Vidalia onion, thinly sliced
* handful of pinenuts
* 4 scallops, preferably U10 size, dry packed, never been frozen (see asterisk at bottom)**
* olive oil (for cooking the scallops)
* sea salt and fresh ground black pepper

OK, first, don't be intimidated by the use of ingredients or techniques listed - honestly, I was so surprised by how easy this turned out! And though most are intimidated by cooking scallops, it is a lot easier than you think. 

First, start with the grapefruit, as you will need some juice for the vinaigrette. 

Segmenting the grapefruit: slice both ends off of the grapefruit so it sits flat on your cutting board. Then, using a knife, start to remove the outer skin or pith of the fruit by cutting around the fruit in a rounded motion:


Continue to do this around the grapefruit to remove all of the outside so you are left with only the inner fruit. Segmenting is pretty simple, just slice around the inner membranes that hold the segments together to remove the fruit (I couldn't take a pic b/c my hands were totally full!)

Next, the vinaigrette. Lately I have been keeping my vinaigrettes super simple, heavily focusing on how fresh citrus juice really heightens the salad. Here, I combine in a bowl the chives, shallots, grapefruit juice, lemon juice, extra virgin olive oil, salt and pepper. I don't even whisk this, just simply mix together with a spoon.  


Before I start the scallops, I get all of my other ingredients prepped: 


Ok, onto the scallops. I simply sprinkle sea salt and pepper on them as I bring my skillet up to high heat and wait for the olive oil to get really hot. A key to perfectly cooked scallops is to have the pan and oil REALLY hot so that they don't stick. The scallops are really only cooking 3-4 minutes a side, if that, so in order to create the color or crust that you want it's best to have everything as hot as possible.


I chose to use my non-stick skillet, but you can use a stainless steel as well.  I just find it is easier to cook them in non-stick.


When cooking scallops, there is a common tendency to overcook them. The perfect scallop is slightly still opaque in the middle when you slice into it, and in this case it was 4 minutes on the first side, flipped them, and then 2 minutes on the other side. And, boy, were these scallops perfectly cooked.

Then, to plate. Toss the lettuces, hearts of palm, and Vidalia onion with the vinaigrette and place on plate. Scatter avocado, grapefruit, and pinenuts on salad and top with scallops...


The acid from the citrus (both vinaigrette and grapefruit segments) really balances well with the buttery-ness of the avocado and the natural sweetness of the scallops. Plus, the welcomed pungency from the shallots, chives, and Vidalia onions really put the "roundness" on all of the flavors, enticing every one of my taste buds.

Oh, and I picked up a fantastic, inexpensive Riesling that paired beautifully. Plow and Stars - Columbia Valley 2008 Riesling, and it was made with organic grapes!
This salad was wholesomely delicious and took about 15 minutes to make. Though it was just a simple dinner "in" for me, it would be a great starter or entree salad for any event this Summer. Cheers and enjoy!

**about scallops: U10 means that less than 10 will equal one pound, so they are larger in size. You can use any size, but I prefer to use larger scallops always. Dry packed: this means that the scallops haven't been soaked in a phosphate solution that makes them whiter and absorb more water. When you cook with "wet" scallops, this solution leaches out, so technically you end up steaming them rather than ever getting a true sear on them. Plus, this phosphate solution is a common ingredient in soaps and detergents, so better to "steer clear" of "wet" scallops and only look for "dry packed" or "chemical free". Look for scallops that have not been previously frozen; fresh scallops will not retain water as frozen scallops will - the frozen scallops will leach a lot of liquid when you are cooking them and will also steam rather than get a good crust on them. For more information, please click on this link: http://culinaryarts.about.com/od/fishseafood/p/freshscallops.htm

"Married" Tomatoes with Kalamata Olives, Garlic, and Basil - Too Simple, yet also Too Good


Summer is finally here, and, with that, I graciously welcome the amazing tomatoes popping up at Farmers Markets...and those growing in my garden (and by "garden" I mean two heirloom tomato plants on my balcony).

I recently started to "re-fall" in love with tomatoes, mostly due to finally having GOOD tomatoes. Growing up, I pretty much detested these lovely, fruitful orbs, mostly because whether it was a sandwich, salad, or anything else using tomatoes, I couldn't stand the texture - mealy, grainy, tasteless. Little did I realize at the time that I wasn't eating a good quality tomato.

Nowadays there are so many fantastic varieties available that either speak for themselves: whether simply sliced and sprinkled with a little sea salt and drizzled with extra virgin olive oil, used to enhance a fantastic salad, or roasted to perfect the perfect pasta or risotto dish (you get the picture).

Or, in my all time favorite case: diced and "married" with pungent garlic, aromatic basil, fruity extra virgin olive oil, and seasoned with salt and pepper. Yes, we are talking about the all-too-common topping to bruschetta. 

But, as I mentioned before, what makes or breaks this simple yet oh-so-yummy appetizer is the tomatoes.

I recently came across some amazing organic Campari tomatoes in the market, which are about the size of cherry tomatoes, but packed with that sweet yet slightly acidic punch you expect from a good tomato. I was craving a light snack, and went straight to my refrigerator to create this delicious take on "bruschetta al pomodoro". I had some pitted Kalamata olives on hand, and honestly, it is what made this recipe rise to new heights. But the true key is having excellent tomatoes on hand (in addition to great olive oil!).


Ingredients:

* 12 Campari tomatoes (or any other fantastic ripe tomatoes), seeded and diced
* 1 C Kalamata olives, pitted and diced
* Handful of fresh basil, chiffonade (demonstrated below)
* 1-2 garlic cloves, finely minced
* Really good extra virgin olive oil
* Sea salt and fresh ground pepper
* Toasted bread rounds

First, quarter and seed the tomatoes


Then dice the tomatoes and the olives and add to bowl


Next up, chiffonade the basil. This is a technique done by laying the basil leaves on top of each other and then rolling them up and slicing very thinly:


Add this sliced basil to the tomatoes with the garlic. Drizzle enough olive oil to coat and toss together. Taste, add some sea salt and pepper, taste again, and let the mix sit for at least an hour. This will allow the garlic to mellow out a bit and also allow all of the flavors to infuse together.


I know, I know, this is too easy, but when you can combine quality tomatoes at their peak with simple complimentary ingredients, you create something that looks this good, and tastes even better. The Kalamata olives just heighten this otherwise basic combination, adding this certain briny-ness that seems to bring out more of the sweetness in the tomatoes. Plus, the pungency of the garlic adds that "one-two" punch that rounds out everything you want on your palate.

This is a "must go to" recipe for the Summer as tomatoes will be in abundance. It is a sure crowd pleaser - and make it your own! It's a building block recipe for added ingredients - herbs, cheese, roasted peppers, shallots, or simply toss with salad greens - you see where I am going with this.

Oh, and don't forget a great glass of Chardonnay, Pinot Gris, or Sauvignon Blanc - as any (or all three...) would go great with this yummy tomato mix!


Butterflied Whole Chicken with Lemony-Herb Marinade


I usually never ever follow recipe to a "T", rather I prefer to use recipes as inspiration for great culinary leaps and bounds. Well, they might not really be "leaps and bounds", but for me they can be great jumps in new directions I hadn't thought of.

So, I recently came across a yummy, "Summer-y" marinade for a whole butterflied chicken on the grill and thought, this is a must try. There is nothing better than a simple bird grilled up that has been bathing in a fantastic blend of ingredients.

And that is what I set out to do.

I love, love everything with lemons in marinades because the citric acid tends to really tenderize the meat. And when it happens to be poultry you are marinating, it REALLY works. And butterflying a chicken is a really easy way to cook a whole bird on the grill. Either do it yourself, as I demonstrate below, or ask your butcher to do it for you.

So, here is a Summer chicken marinade you must have on your list of things to BBQ. If not the whole bird, at least use this for some BBQ'ed thighs, breasts, etc. It would also be great for indoor cooking during the "off-outdoor months". I promise, you will not be disappointed.

* 1 4-5 pound chicken, rinsed, and giblets removed
* juice of 2 lemons
* 1/4 C white wine
* 1/2 C olive oil (preferably extra virgin)
* about 1/2 C fresh oregano leaves, picked from stems
* about 1/3 C fresh thyme leaves, picked from stems
* 5 cloves garlic, peeled
* 3 shallots (or 1 medium onion), quartered
* salt and pepper

Oregano and Thyme (from the garden...)


To begin the marinade, I will reveal my secret to ultimately juicing lemons (or any other citrus fruit). Well, it really isn't a "secret", but most pals who see me do this usually say, "I never thought of that!"

Place the lemons in the microwave for about 15 seconds, or until warm to the touch. Placing them in the microwave loosens the pulp and makes it easier to get more juice from the lemon when you squeeze it.


Then, I slice the lemons in half and use my tongs to squeeze the lemons and release the juice:


If you only have a few lemons (or other citrus) to juice, this is the easiest way without having to use a juicer. Also, no worries about fishing out the seeds because it is all just a marinade!

Then, continue adding the rest of the ingredients: white wine, olive oil, oregano, thyme, garlic, salt and pepper.


Blend all together - mixture will be pretty loose.


Next, butterfly the bird. All this requires is some really sharp kitchen shears. All you have to do is cut the backbone out of the chicken. It may look daunting, but honestly, it is extremely easy, but, as I mentioned before, you can ask your butcher to do it for you.


Then, turn the bird over, skin and breast side up, and "crack" the breast bone by pushing down on the chicken to "flatten" it out. This all may seem a bit odd if you have never done it before, but you can't screw it up. Remember, this bird is just going to be thrown on the grill.


Either place the chicken in an oversized plastic bag or just put in a large baking dish and cover with marinade.


Cover and pop in the refrigerator for at least 12 hours, turning over if you like (I did). I marinated my bird for 24 hours - make sure not to marinate more than 24 because the acid from the lemons may negatively "break down" the proteins and make the chicken meat mushy.

And those 24 hours were so worth the wait.


Just the aroma alone of onions, garlic, and the fresh herbs as the chicken hit the BBQ grates was enough to send me salivating. I think we BBQed this amazing bird 15 minutes a side, but I would suggest just using a meat thermometer in the breast until it reaches 160-165F. Remove from grill and (in addition to patiently waiting) allow to rest for about 10 minutes. Then, DEVOUR.


Using what was on hand, I made a salad with my simple chive/lemon "vinaigrette" (lemon juice, chives, shallots, extra virgin olive oil, salt and pepper), pine nuts, goat cheese, and avocado. Also added to the plate was simply grilled onions and some toasted bread, plus the welcome addition of a bright lemony-caper sauce my dining partner had in his fridge which paired with the citrus and herb essence from the chicken.

All in all, I think this is a fantastic recipe for the Summer and Fall months for those who plan to be outside "manning" a BBQ or inside with a grill pan. Plus, butterflying the chicken is a small but dramatic change from just using cut up parts of the chicken, and it cooks up quicker as well.

Keeping it simple, delicious, and crowd pleasing is always a good thing, and this chicken does the trick. Oh, and of course the meal always tastes better with a crisp glass of Chardonnay. Cheers and Enjoy!